The Story Behind the Recipe
Some desserts have the power to stop you in your tracks — not because they’re fancy or complicated, but because they taste like joy. This Cherry Pistachio Cheesecake Recipe is exactly that kind of dessert. It’s creamy, nutty, sweet, and just a little bit tart — a perfect symphony of textures and flavors that come together like magic.
The first time I made this Cherry Pistachio Cheesecake Recipe, it wasn’t for a holiday or a party — it was just one of those quiet weekends when I needed a little sweetness to brighten the day. I’d found a jar of cherry preserves in the pantry and a half bag of pistachios left from a cookie recipe, and I thought, why not bring them together?
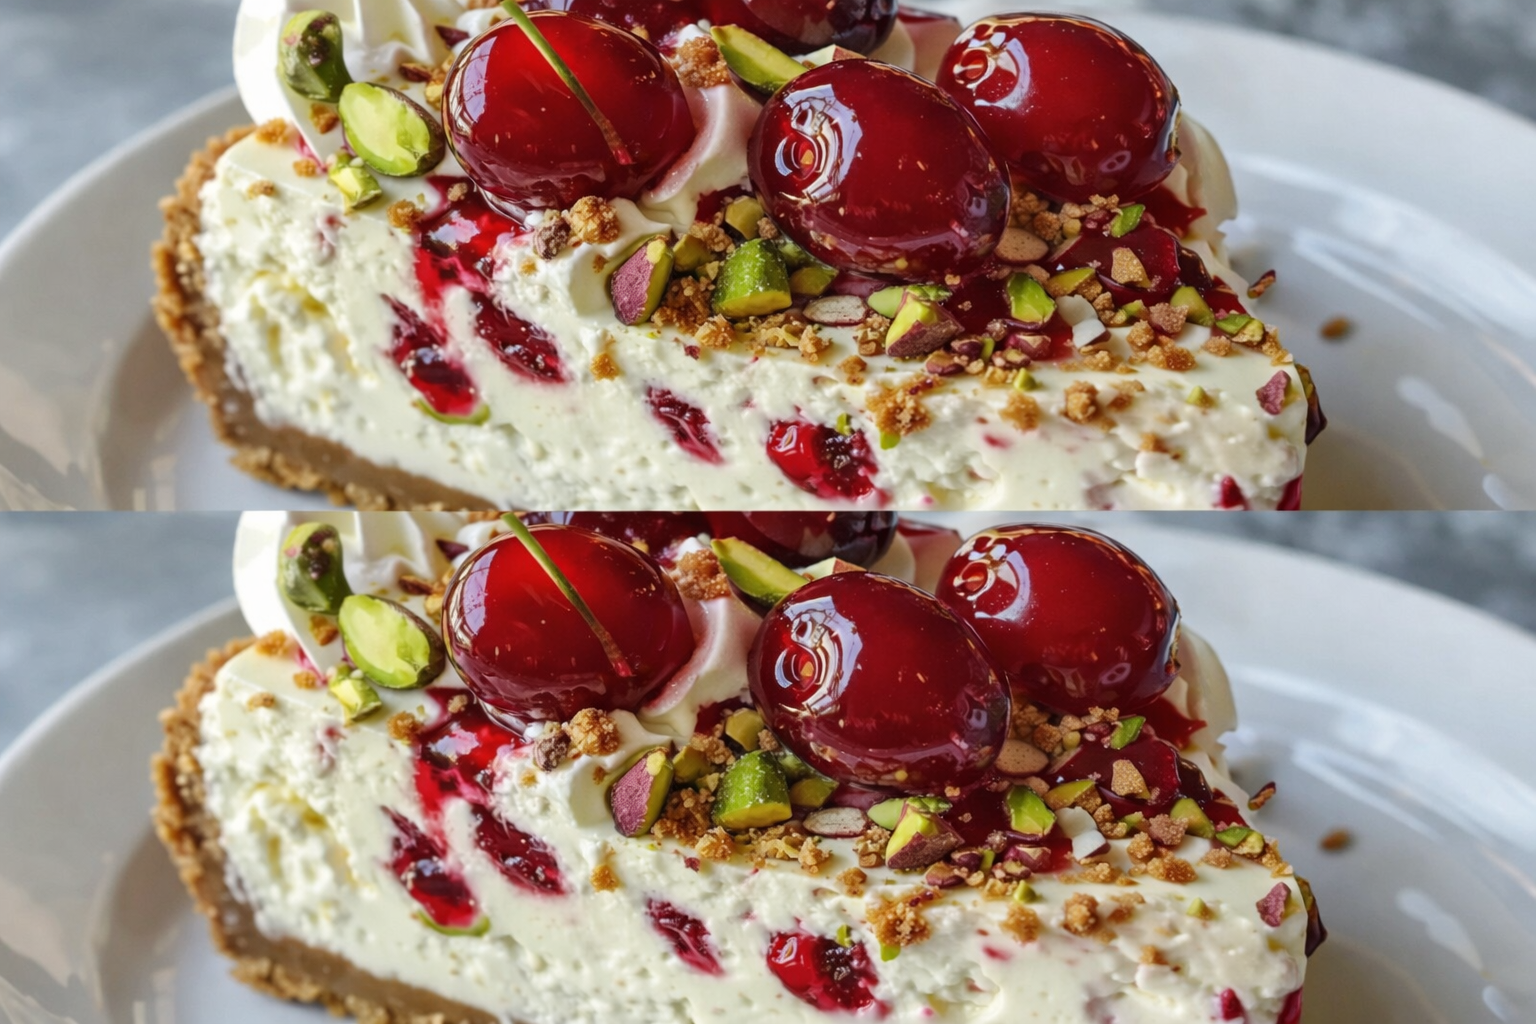
What came out of the oven that day was nothing short of delightful — smooth, tangy cream cheese filling with a crunchy pistachio crust and a glossy cherry topping that glistened like jewels. The smell alone was enough to bring everyone into the kitchen.
Now, this Cherry Pistachio Cheesecake Recipe has become one of my most treasured desserts — perfect for holidays, birthdays, or any day that calls for something special. It’s the kind of dessert that looks elegant, tastes heavenly, and always brings smiles to the table.
What Makes This Recipe Special
This isn’t just another cheesecake — it’s a flavor story. The rich creaminess of the filling meets the nutty crunch of pistachios, while the cherries add that burst of sweetness and color that make every slice irresistible.
Here’s what makes this Cherry Pistachio Cheesecake Recipe so special:
- Unique flavor pairing: Sweet cherries and earthy pistachios are a match made in dessert heaven.
- Beautiful presentation: That glossy cherry topping looks straight out of a bakery window.
- No water bath stress: This recipe bakes beautifully without complicated steps.
- Perfect texture: Creamy, smooth, and luscious with a buttery, nutty crust.
- Make-ahead friendly: Tastes even better after chilling overnight — perfect for entertaining.
It’s simple enough for beginners and impressive enough for celebrations — a true Granny’s Lil Kitchen masterpiece that feels both cozy and classy.

Ingredients – Fresh, Simple & Full of Flavor
For the Crust
- 1 ½ cups crushed graham crackers (or digestive biscuits)
- ½ cup finely chopped pistachios (unsalted)
- ¼ cup granulated sugar
- 6 tablespoons unsalted butter, melted
Granny’s Tip: Toast the pistachios lightly before chopping — it deepens their flavor and makes your Cherry Pistachio Cheesecake Recipe extra aromatic.
For the Cheesecake Filling
- 24 oz (3 packages) cream cheese, softened
- 1 cup granulated sugar
- 3 large eggs, room temperature
- 1 cup sour cream
- 1 teaspoon vanilla extract
- ½ teaspoon almond extract
- 2 tablespoons all-purpose flour
- Pinch of salt
For the Cherry Topping
- 2 cups pitted fresh or frozen cherries (or cherry pie filling for convenience)
- ½ cup sugar
- 1 tablespoon lemon juice
- 1 tablespoon cornstarch mixed with 1 tablespoon cold water
- ¼ teaspoon almond extract (optional, enhances the cherry flavor)
For Garnish (Optional but Beautiful)
- Crushed pistachios
- Whipped cream
- Fresh mint leaves or extra cherries
Step-by-Step Cooking Instructions
Step 1: Prepare the Crust
Preheat your oven to 325°F (160°C). Grease a 9-inch springform pan and line the bottom with parchment paper.
In a mixing bowl, combine graham cracker crumbs, pistachios, sugar, and melted butter. Mix until the texture resembles wet sand.
Press the mixture firmly into the bottom of your pan, and slightly up the sides. Bake for 8–10 minutes until lightly golden and fragrant. Let cool while preparing the filling.
Granny’s Secret: A firm crust is key — use the bottom of a measuring cup to press it evenly and prevent cracking later.
Step 2: Make the Creamy Cheesecake Filling
In a large bowl, beat cream cheese with sugar until smooth and fluffy, about 2–3 minutes.
Add the eggs one at a time, mixing gently after each. Don’t overbeat — it keeps the texture creamy and prevents air bubbles.
Next, add sour cream, vanilla, almond extract, flour, and salt. Mix on low speed until just combined.
Pour the filling over the cooled crust and smooth the top with a spatula.
Pro Tip: Room-temperature ingredients blend smoothly and prevent lumps in your Cherry Pistachio Cheesecake Recipe.
Step 3: Bake to Perfection
Place your cheesecake on the center rack. Bake at 325°F (160°C) for 55–65 minutes, or until the center is just set but still slightly jiggly.
Turn off the oven, crack the door slightly, and let the cheesecake rest inside for 1 hour — this gentle cooling prevents cracks.
Remove, cool completely at room temperature, then refrigerate for at least 6 hours (overnight is even better).
Granny’s Note: Patience pays off — chilling lets the flavors develop and the texture firm up beautifully.
Step 4: Make the Cherry Topping
In a small saucepan, combine cherries, sugar, and lemon juice. Cook over medium heat for 5–7 minutes, until the cherries release their juices.
Stir in the cornstarch slurry and simmer for another 2 minutes, until thick and glossy.
Remove from heat and stir in almond extract. Let cool completely before spreading over the chilled cheesecake.
Flavor Tip: The sweet-tart cherry topping balances the creamy filling perfectly — it’s the heart of this Cherry Pistachio Cheesecake Recipe.
Step 5: Assemble and Chill
Once both the cheesecake and cherry topping are cool, spoon the topping evenly over the surface of the cheesecake.
Refrigerate for at least 1 more hour to set before slicing.
Granny’s Tip: Use a sharp knife dipped in warm water for clean, perfect slices every time.
Serving Suggestions – What to Pair It With
This Cherry Pistachio Cheesecake Recipe is luxurious enough to stand alone, but a few thoughtful pairings make it even more delightful.
🍒 Simple & Elegant
- A dollop of whipped cream and a sprinkle of chopped pistachios.
- Drizzle of warm white chocolate or caramel sauce.
☕ Cozy & Comforting
- Freshly brewed coffee or espresso.
- Vanilla chai or almond milk latte.
🍾 Celebration Style
- Sparkling rosé or sweet Moscato wine.
- Garnish each slice with a cherry and mint leaf for an elegant presentation.
Serving Moment: The way the cherry sauce glistens and the pistachio bits crunch — it’s not just dessert, it’s art.
Customization & Variations
The beauty of this Cherry Pistachio Cheesecake Recipe is its versatility — you can tweak it to match your mood, your ingredients, or the season.
🍓 Different Fruit Toppings
Swap cherries for raspberries, strawberries, or blueberries.
🍫 Chocolate Lovers
Drizzle melted dark chocolate over the top before serving.
🥥 Dairy-Free Version
Use dairy-free cream cheese and coconut cream for a lighter, plant-based twist.
🧁 Mini Cheesecakes
Make individual cheesecakes in muffin tins for parties — adorable and portion-perfect!
💚 Extra Pistachio
Add ¼ cup ground pistachios directly into the filling for more nutty depth.
Granny’s Note: This dessert shines in any form — elegant or rustic, chilled or freshly topped. Every version keeps that perfect sweet-nutty balance.
Storing & Freezing
🧊 Storing
Cover and refrigerate for up to 5 days. Keep it tightly sealed to prevent absorbing fridge odors.
❄️ Freezing
Wrap the cheesecake (without the topping) in plastic wrap and foil. Freeze for up to 2 months. Thaw overnight in the fridge before topping with cherries.
Granny’s Tip: Always add the cherry topping after thawing — it keeps that glossy finish and fresh flavor intact.
Nutritional Snapshot (Per Serving – Approx.)
(Serves 12)
- Calories: 420
- Protein: 8g
- Carbohydrates: 34g
- Fat: 29g
- Fiber: 2g
- Sugar: 25g
- Sodium: 260mg
Rich, satisfying, and absolutely worth every spoonful — this Cherry Pistachio Cheesecake Recipe is indulgence done right.
Reader Q&A – Common Questions
1. Can I use cherry pie filling instead of homemade?
Yes! It’s a great shortcut — just make sure to use a quality brand for best flavor.
2. Can I make this crust gluten-free?
Absolutely — use gluten-free graham crackers or almond flour.
3. Can I use low-fat cream cheese?
You can, but full-fat gives that signature creamy texture.
4. What if my cheesecake cracks?
No worries — the cherry topping hides everything beautifully!
5. Can I make this ahead?
Yes, it actually tastes better the next day after chilling.
6. Can I skip the almond extract?
Sure! Vanilla alone still gives a lovely flavor.
7. Can I use salted pistachios?
Yes — just reduce added salt slightly.
8. How long should I chill it before serving?
At least 6 hours, but overnight is best.
9. Can I freeze leftovers with the topping?
You can, but texture is best when the topping is added fresh.
10. How do I cut perfect slices?
Warm your knife under hot water, wipe it clean between slices, and cut confidently!
Final Thoughts 🍽️
There’s something truly magical about this Cherry Pistachio Cheesecake Recipe — it’s rich but balanced, indulgent but comforting, and always, always beautiful. Every bite gives you creamy cheesecake, buttery crust, crunchy pistachios, and that burst of juicy cherry sweetness.
It’s the kind of dessert that turns an ordinary day into something special — one that feels as elegant as it does nostalgic.
Whether you’re making it for family, friends, or just yourself (no judgment here!), this cheesecake is the kind of treat that brings people together, sparks smiles, and leaves everyone asking for “just one more slice.”
Because in Granny’s Lil Kitchen, desserts are more than recipes — they’re memories, traditions, and moments of pure joy.
💛 Tried This Recipe?
If you make Cherry Pistachio Cheesecake Recipe, I’d love to see your beautiful creations! Tag your photos and follow me on Pinterest at grannyslilkitchen — where every recipe is made with sweetness, comfort, and a sprinkle of love.

Hi, I’m Sayan, the creator behind grannyslilkitchen.com. I’m passionate about making home cooking easy and enjoyable for everyone. Whether you’re a beginner or an experienced chef, my goal is to help you create delicious meals with simple ingredients.